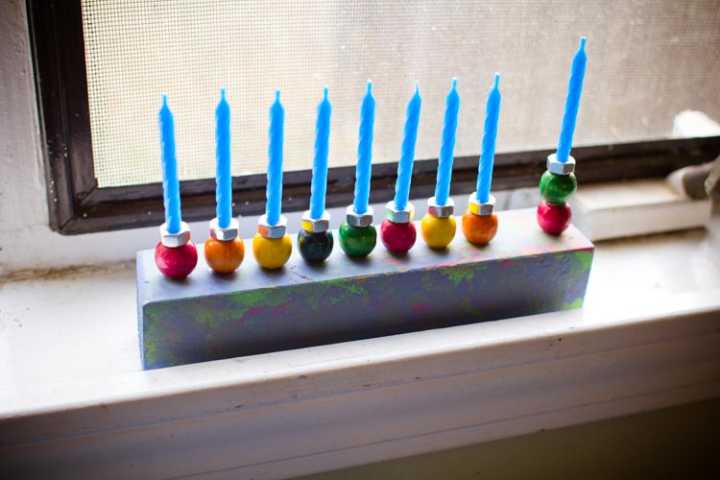
Sparkle Craft: Woodblock Menorah
In the Martin & Sylvia story “Festival of Lights,” we go with Martin and Sylvia to their town center, which holds many festive events throughout the year. During December, there are several town traditions, including a “Festival of Lights,” where the shopkeepers decorate their storefronts in lights.
When Martin learns that Hanukkah is also called the Festival of Lights, he begins to discover the similarities between all the festivals and holidays that take place during this time of year. And he and Sylvia are inspired to create a festival of their very own.
Like Martin, I've always thought it was so wonderful that — with all of our varied backgrounds and history — most human cultures have some sort of mid-winter holiday that celebrates light. Regardless of how different we are, we all seem to have a universal need to come together and make light when it's cold and dark outside.
My family celebrates Christmas, but one other light festival I've always been enamored with is Hanukkah.
As Martin learns, Hanukkah celebrates the miracle of sacred oil that was meant to last for one day, but lasted for eight. To remember this miracle, Jews around the world light candles on a menorah — one additional candle every night — for eight nights. While menorahs are often quite beautiful, cute or themed “children's menorahs” are also common.
This week's craft is a woodblock child's menorah that can be made with a few simple materials from your local craft and hardware stores. I've given you the exact measurements of the materials I used below. If you follow these directions exactly, your menorah will be perfectly sized to fit traditional birthday candles, but feel free to scale it up if you'd like to use larger candles.
Woodblock Menorah
Materials
A block of wood (about 8 inches long)
Craft paint
Paint brushes
Superglue
10 ⅝-inch wooden beads
9 ¼"-20 hex nuts
9 birthday candles
Directions
Unless you're doing this with a much older child, I recommend making this a joint parent-child project. Let your kiddo take charge of painting the wood, but make sure an adult handles all the superglue.
Begin by letting your child paint the block of wood. My daughter loved the effect of swirling different colors on top of each other, but let your child take the lead.
When the wood is dry, arrange nine of the wooden beads evenly across the top and glue them down. Glue the tenth bead on top of the ninth bead to make a higher spot for the “shamash” or “helper” candle. (This is the candle you'll use to light the others.)
Allow the glue and beads to sit for about 5 minutes, then glue a hex nut on top of each bead. Let the glue dry for several hours.
When the sun has set, twist a birthday candle into the elevated holder and also into the hex nut next to it. Light the “helper” candle first, then carefully use it to light the first candle. The second night, you'll light 2 candles, then 3 on the third night, and so forth, until all 8 candles are lit.
Happy Hanukkah!
If you liked this playlist, here are others you might enjoy:
Not yet a subscriber? Try a free trial HERE.
About the Author

Meryl Carver-Allmond
The Sparkle Kitchen Series is created by Meryl Carver-Allmond.
Meryl lives in a hundred-year-old house near the prairie with her sweet husband, two preschoolers, one puppy, one gecko, and about ten chickens. While she's been writing since she could pick up a pen, in recent years she's discovered the joy of photography, too. She feels lucky to be able to combine those skills, along with a third passion — showing people that cooking for themselves can be healthy and fun — in her Sparkle Kitchen posts.

